
Recollection
Quickly access this page using the link:
Preparation
This is just a reminder for people who already understand the fight. Skip this for now if you have no idea what this is about.
Things to agree on before pulling
Everyone:
- Pick a clock spot
- Choose EF1/3 baiting order
- Choose RB3 positions
- Choose EF2 strategy. If N/S, agree on MRRM/RMMR for DPS and THHT/HTTH for supports
- Choose RB4 directions

Tanks:

Healers:
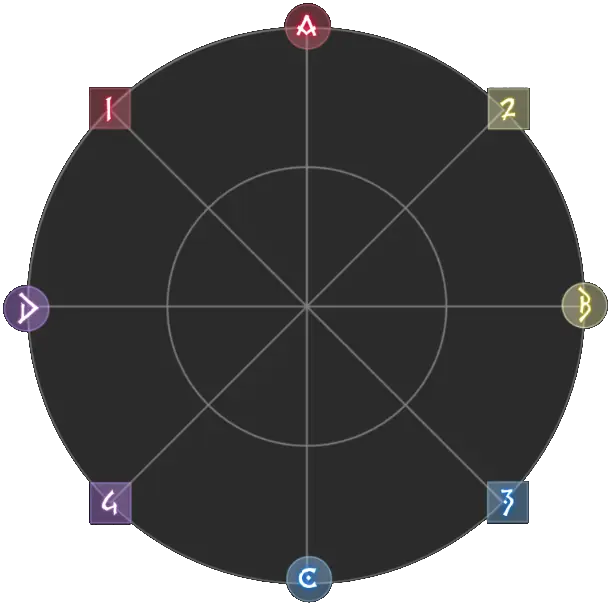
Standard clock positions
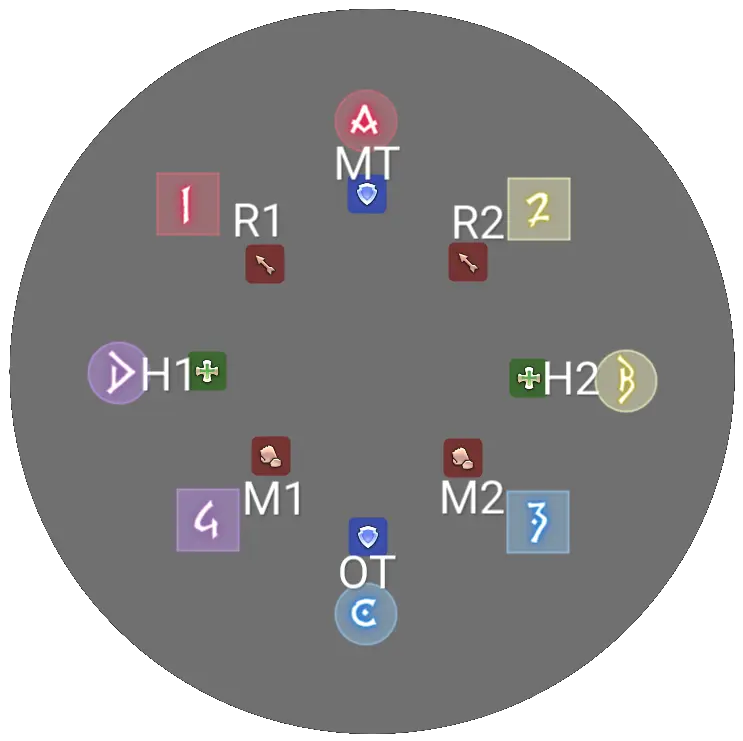
Positions:
- MT/OT - main/off tank
- H1/H2 - healers
- R1/R2 - ranged DPS
- M1/M2 - melee DPS
Light parties (groups):
- LP1 (G1) - MT/H1/R1/M1
- LP2 (G2) - OT/H2/R2/M2
EF1/3 baiting order
sup first (raidplan, wmg, -wj9)
Supports follow the marks 1 and 3, while DPS - 2 and 4. You can either just convert the marks into moves for your role as they appear or remember the swaps like in the hector strat.
dps in always first (hector)
DPS always start in, then if the first two marks alternate, you swap after two attacks, if the first two marks are the same, you swap after the first and the third attacks.
in this particular set of marks the moves are exactly the same as in raidplan
RB3 positions
tn (true north, eu raidplan, wmg)
Stand at your standard clock spot, move to the adjacent correct tile or clockwise
relative north (hector, na raidplan, -wj9)
Stand at you clock spot relative to the new north defined by the two inner rose tiles separated by the inner non-rose tile, move to the adjacent correct tile or clockwise
in this particular case the moves are exactly the same as in raidplan, only starting positions are different
EF2 strategy
n/s (mrrm/rmmr, thht/htth) (raidplan, wmg, -wj9)
Supports stand north at the edge of the hitbox, DPS stand south at the edge of the hitbox. When the stacks end (donuts for the role with donuts), supports spread around the boss on the northern side in the order of THHT/HTTH from west to east, while DPS spread on the southern side in the order of MRRM/RMMR.
n/s mrrm thht
w/e (hector)
Same as n/s but replace north with west and south with east. Spread positions change to thht and rrmm from north to south.
w/e
braindead
Stand in the boss to share both stacks, if you have a donut, drop it further away from the boss. Then take your standard clock spots.
RB4 chain breaking direction
relative (raidplan, wmg, -wj9)
From their initial chain stack position (the two non-rose tiles), supports run left, DPS run right.
w/e (hector)
Supports run west, DPS run east.
RB6 roses drop areas
eu raidplan (wmg)
hector
na raidplan (-wj9)
the raidplan prefers melee south ranged north, but also allows for melee north (close to the boss) with ranged south
Trivial casts
Thorned Catharsis
Unavoidable raid-wide damage.
Use damage reduction abilities.
Specter of the Lost
Tethered AoE tankbusters.
Let tanks pick up the tethers and move away from the party.
Stock Break
Multi-hit party stack.
Stack and use defensives.
Perfumed Quietus
Unavoidable raid-wide damage.
Use damage reduction abilities.
Roseblood Bloom
Arena change for the next RB phase.
Get ready for action.
Core mechs
Shock
q
One role gets small circles, the other - big donuts, then 4 towers appear around the boss. When the timer ends, small circles turn into puddles that quickly deal AoE damage.
a
If you have a big donut, stand in the tower closest to the marker of your clock spot color. Make sure you give enough space for melees to run to the boss. If you have a small circle, just find a safe spot nearby and run away from the puddle as soon as it appears.
In this case, the off tank who got the big donut moved from his blue C mark to the tower at the blue 3 mark.
Escelons' Fall 1
q
The boss shows marks 4 times - either long purple or short pink. After that, she does 4 attacks, each time targeting 4 players that are either closest to her or furthest, depending on the marks shown. Long purple - furthest, short pink - closest. Each attack gives a debuff for a few seconds killing you if you get hit by the attack two times in a row.
a
Stand at your clock spot, look at the marks and follow your party's baiting order. If you're not the one to bait the current mark, make sure to stand in a place opposite of the baiters or at least right at the edge of the hitbox. Because the delay is quite long, if you're too lazy, realistically you can just rely on your teammates moves, following your role mates and doing the opposite of the other role, but obviously this is not the best idea, if they make a mistake, you make it too.
As an M2, the reaper stood at 3 and followed the standard sup first baiting strategy, turning far-far-close-close marks into in-out-out-in moves for DPS.
Blessed Barricade
q
The boss becomes untargetable and 4 orbs spawn around her. Soon after, a 3-man stack appears near an orb on each side, while one support and one DPS get marked by newly spawned adds, on the west for supports, on the east for DPS. After some time, the add makes a huge cleave attack on the side of her sword. This repeats 4 times until everyone plays their add mechanic exactly once.
a
Go to the east if you're a DPS and to the west if you're a support, soak the towers on your side as they appear and keep attacking the orbs. If you get marked, turn the add such that the sword in her hand is located on the outer side of the arena.
Roseblood Bloom 1
q
After casting the first Roseblood Bloom, the boss executes Alexandrian Thunder II. That's a simple spinning AoE attack that also lights up rose tiles making them deal damage.
a
When the arena changes, look for the long safe path (without rose tiles covering both inner and outer sides). As soon as the spinning indicator shows, move to the starting point of this path and follow it.
q
Immediately after, Alexandrian Thunder III gives everyone a spread circle that lights up rose tiles as well.
a
Spread around and make sure not to stand on a rose tile.
Roseblood Bloom 2
q
After casting the second Roseblood Bloom, the boss executes Thunder Slash. She makes several cone attacks lighting up rose tiles as well as a donut and melee AoE attack in the order defined by where the roses on the circle around her appear. If they are inside of it - then melee AoE first, outside - donut first.
a
When the arena changes, make a mental note of the singular non-rose inner and outer tiles. As the cast starts, look at the rose placement around the circle - if they are outside, go to the inner non-rose singular tile, otherwise to the outer non-rose singular tile. After the first hit, move in or out, then dodge cone attacks.
As the roses first appeared on the outer rim of the circle, the party went to the inner non-rose tile.
Roseblood Bloom 3
q
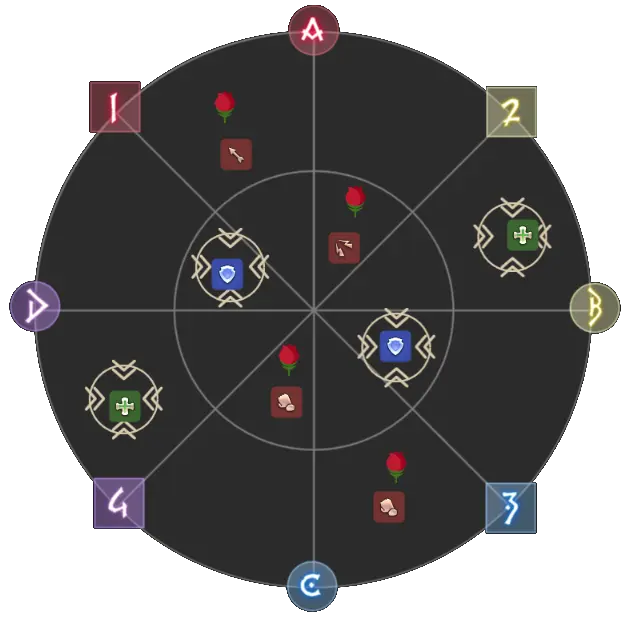
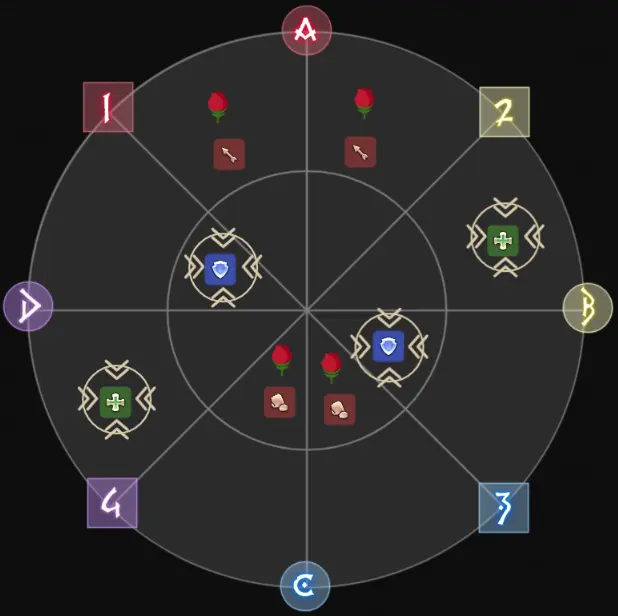
After casting the third Roseblood Bloom, the boss casts Bud of Valor followed by Emblazon. This causes 4 towers to appear and gives rose marks to supports or DPS. After some delay, the roses disappear turning the tiles people with roses stand on into rose tiles. If some towers get connected by rose tiles as a result, they will fail.
a
When the arena changes, look closely at rose tiles. Find the two inner rose tiles separated by a non-rose tile and then stand at your position defined by the chosen strategy. If you get a rose, go to either that one non-rose tile you found earlier or one of the three inner non-rose tiles on the opposite side of it, whatever is closest to you. As soon as you drop the rose, move to the nearest non-rose tile. If you don't have a rose, soak the closest tower.
As an M2, the reaper stood at 3 according to the standard TN strategy and, with no rose to drop, soaked the closest tower.
Escelons' Fall 2
q
This mech happens some time after the RB3. Three people of one role get a donut, the fourth gets the stack. One person of the other role gets the stack too. At the same time, the boss shows the same marks as during the first Escelon's Fall. The stacks resolve first, then the donuts disappear, which is immediately followed by the same cone attacks as in the first Escelon's Fall.
a
Stand at the starting positions defined by the chosen strategy. Take a note of which role got the donuts, then immediately switch your attention to the marks. The role without donuts is always the first one to bait, no matter what strat you follow. As with the previous EF, you can either convert the marks into the moves for your role or think in terms of swaps. As soon as the stack ends, if you are the role without donuts, spread according to the strat and play the mech. The role with donuts do the same only after their donuts end.
As a DPS, the reaper stood south at the edge of the hitbox following the n/s (mrrm, thht) strat. The donuts appeared on supports, meaning DPS bait first this time. Thus, close-close-far-far turned into in-out-out-in moves for DPS. When the stacks disappeared, the reaper moved to his new position according to the strat and executed the correct moves. The tank on the right almost failed the third bait barely making it.
Roseblood Bloom 4
q
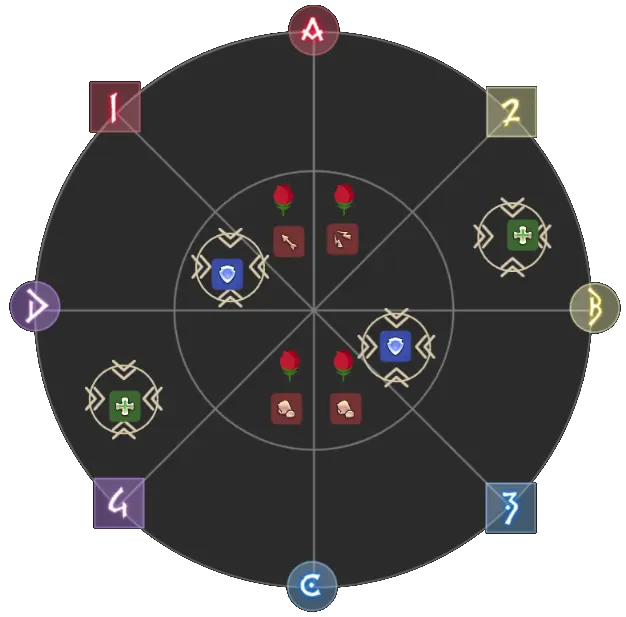
After casting the fourth Roseblood Bloom, the boss casts Bud of Valor followed by Emblazon. This spawns two spread zones near the boss and gives rose marks to one role. After a brief delay, the other role gets marked with spread circles around them. The roses turn tiles into rose tiles like in RB3. If a spread touches a rose tile, all those linked rose tiles light up and deal damage.
a
If you have a rose mark, go the 4 non-rose tiles opposite of the two spread zones near the boss and stand on one of them. Inner tiles are for tanks/melee DPS and outer tiles for healers/ranged DPS. If you have a spread circle, spread around on the side of the two spread zones while making sure you don't touch the outer rose tiles.
If the reaper stood at the pictomancer's position instead, he could maintain full melee uptime, but it was too late. Fortunately, the DPS check is basically non-existent for this fight.
q
Immediately afterwards, Encircling Thorns is cast, chaining supports with DPS. Soon after, at the start of Alexandrian Banish III a healer gets a stack and a rose spread which explode at the end of the cast. The stack spreads to all connected tiles.
a
Run to the two inner non-rose tiles, stack there and wait until the chains appear. Then immediately run to the edges of the arena in opposite directions according to your chosen strat. The spread circle should touch the rose tile and the DPS should stand on their rose tile, thus sharing the stack with supports.
Here, DPS ran right according to the raidplan strat, but the reaper was too slow to reach the rose tile before the cast ended, while the pictomancer completely forgot about that part. This caused the stack to be shared only by 6 people, thereby killing the dancer who was not at full hp and almost wiping the party.
Escelons' Fall 3
q
This mech happens some time after the RB4. Two adds spawn on the opposite sides of the arena. After the boss shows the second mark, one of the adds charges the sword indicating the cleave area and does the attack on the fourth mark. Then the boss executes her normal EF cone attacks. On the third attack, the other add charges the sword and does the cleave after the boss ends her cone attacks.
a
Stand at your standard clock spots and position your camera such that you see both adds and boss marks. Keep note of the marks while dodging the first cleave, then immediately return to your clock spots to play the mech the same way you do the first EF according to you chosen baiting strat. Keep the second add in your vision and when the sword charges, check where the cleave is going to be. Only after the fourth cone attacks you move to dodge the cleave.
As an M2, the reaper stood at 3 and followed the standard sup first baiting strategy, turning far-close-close-far marks into in-in-out-out moves for DPS, while making sure to not get hit by the cleave. The pictomancer lost track of the marks, standing far on the first and second attacks, resulting in sage's and their own deaths.
Roseblood Bloom 5
q
After casting the fifth Roseblood Bloom, the boss casts Valorous Ascension dealing raid-wide damage, spawning two wave-like attacks covering half of the arena and doing this again to cover the other half of the arena perpendicular to the previous one, then starts casting Thunder Slash like in the RB2. The attacks start going off when the cast finishes.
a
As soon as the first waves appear, move to the other half of the arena making sure you stand on non-rose tiles. Then look at the roses position around the circle and the first cone attacks to find the only safe tile. After the first wave attacks launch, just move to the opposite side to the non-rose safe tiles there, making sure you still remember to dodge the other part of the melee AoE/donut attack.
Roseblood Bloom 6
q
After casting the sixth Roseblood Bloom, the boss casts Bud of Valor followed by Emblazon. This causes 4 towers to appear and gives rose marks to supports or DPS like in RB3. At the same time, the boss prepares some AoE attacks executing them at the end of Holy Hazard.
a
Stand at your clock spots and move to the closest tower if you don't have a rose mark. If you have a rose mark, place it somewhere such that it doesn't connect any towers together. It's honestly harder to make them connect but for consistency purposes you can take a look at proposed rose positions by different strategies. Use tank LB3 during Holy Hazard cast or your defensives to ignore the AoE attacks. Seriously, that's what every party does.
As an M2, the reaper stands at 3, then moves to the closest tower. The tank uses LB3 during the cast so the party barely suffers any damage.