
AAC Cruiserweight M1
Quickly access this page using the link:
Preparation
This is just a reminder for people who already understand the fight. Skip this for now if you have no idea what this is about.
Things to agree on before pulling
Everyone:
- Pick a clock spot
- Choose Disco Infernal spotlight strategy (for melee classes only)
- Choose Arcady Night Fever sides & spreads
- Choose alpha/beta debuff strategy
- Choose Quarter Beats pairs

Tanks:

Healers:
Standard clock positions
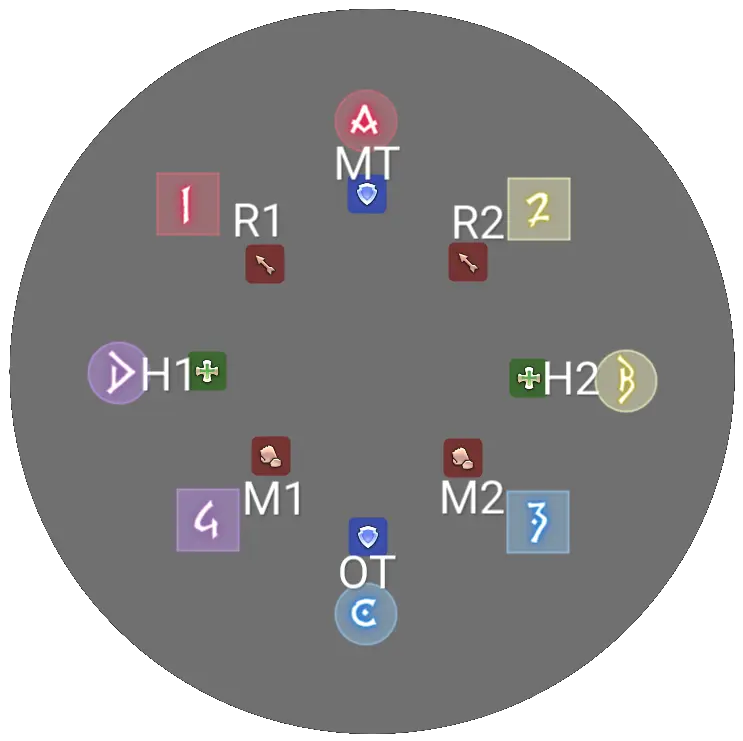
Positions:
- MT/OT - main/off tank
- H1/H2 - healers
- R1/R2 - ranged DPS
- M1/M2 - melee DPS
Light parties (groups):
- LP1 (G1) - MT/H1/R1/M1
- LP2 (G2) - OT/H2/R2/M2
Disco Infernal melee spotlights
raidplan (6pH, toxic, tf)
First you need to understand that the near spotlights on red tiles appear on opposite sides (not diagonal like far spotlights) - either on the south/north or west/east. If you're MT/M1, look at the western and/or northern side when the arena changes and remember where the initial red tile spotlight is - north or west (personally I like thinking about relative positions here - like red is on the right/left/far/near). Then look at your debuff duration. If it's long - your spotlight will be in an area of the red tile spotlight. If it's short - your spotlight will be in an area with the spotlight on the safe tile at the moment of the arena change. OT/M2 should look at the eastern and/or southern sides instead, then follow the same logic.
notice there are 2 possible tiles for each spotlight:
hector
While the raidplan basically divides the arena diagonally to choose who gets which spotlight, here the arena is divided vertically into west and east only, which accidentally allows you to completely ignore the timers. All you need to do if you're MT/M1 is to remember the spotlight at the red tile on the western side when the arena changes, OT/M2 - on the eastern side, no matter if it's north or south. Then you just stand around there. When your timer ends, your spotlight will be somewhere near there.
possible spotlight tiles are outlined in green
Arcady Night Fever sides & spreads
raidplan (6pH, toxic, tf)
Supports spread on the west and DPS on the east, in such a way that there are safe spots on the north and south. After getting hit by the cone attack, start moving north/south to one of those safe spots where you'll keep moving back and forth. The strat sucks honestly because there's just not enough space to comfortably spread so an attack often hits multiple people instead of one.
hector
Supports spread on the north and DPS on the south taking all available space (no safe spots defined). After getting hit by the cone attack, move left/right to dodge the next repeating attack on your spot, then return back to where you were to keep going back and forth.
Alpha/Beta debuffs strategy
raidplan (6pH, toxic, tf), hector, conga line
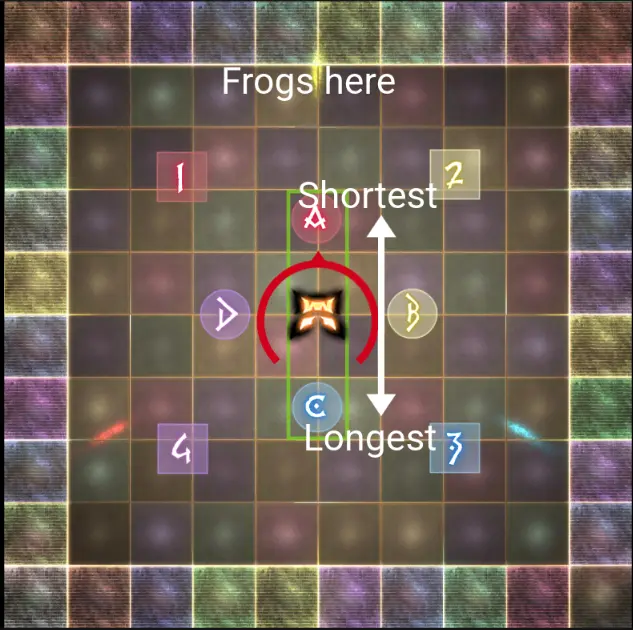
Look at your debuff timers and form a line such that every alpha-beta pair with the same debuff durations stand on the same tile. I like to preposition myself for the first frog first, then when the cast passes the midpoint and gets to ~70% I look at my debuff duration. At that point, it will be one of 5/10/15/20 secs which can be easily mapped into 1/2/3/4 tile. Keep in mind that you might hear different timer values from different people depending on when exactly they look at the timer.
no conga
Stand to the north or south of the boss, when the timer gets to 5 secs run to the center, wait till it expires, then run back to allow others do the same.
Quarter Beats pairs
old raidplan (6pH, toxic, tf)
- MT - M1
- OT - M2
- R1 - H1
- R2 - H2
hector (not used during frogtourage), new raidplan (used only during ride the waves, funky floor 2 is the same as old raidplan)
- MT - R1
- M1 - H1
- OT - R2
- M2 - H2
Trivial casts
Deep Cut
Cone AoE tankbusters.
If you're a tank, move away from the party and use defensives.
Celebrate Good Times
Unavoidable raid-wide damage.
Use damage reduction abilities.
High-NRG Fever
Enrage that's casted shortly after Frogtourage Finale.
Try again.
Core mechs
2/3/4-snap Twist & Drop the Needle
q
At some points in the fight, the boss casts Flip to A-side or Flip to B-side. This prepares role or light party stacks that happen at some later time after a 2/3/4-snap Twist & Drop the Needle cast.
a
Remember: A - role, B - light party. Pay attention to these casts, otherwise you won't know how to react to the 2/3/4-snap Twist & Drop the Needle. In a lot of parties, there's at least one person who uses macros to send which cast, A or B, the boss did, so that later people can just look at the chat to see what to do.
q
The actual 2/3/4-snap Twist & Drop the Needle cast does multiple half-arena cleaves on the same side, the amount of attacks depending on the number of snaps. Then one attack happens on the other side of the arena, after which the boss does AoE attacks that require you to stack.
a
Recall whether this is supposed to be role or light party stacks. For role stacks, tanks move north, DPS - south, healers - center. For light party stacks, LP1 moves north, LP2 moves south, light parties are formed based on the standard positions. Notice how M2 and R2 move south no matter what reducing their mental load during the fight.
Here a Flip to B-side was cast some time before, which requires light party stacks. Thus, as an M2, the reaper stood south, along with other LP2 members.
Flip to A-side was cast before, so people stacked by their roles. As an M2 (the easy noob spot), the reaper still keeps standing south.
Disco Infernal / Funky Floor
q
After the Disco Infernal cast, a checkerboard pattern appears, as well as multiple spotlights - 4 close to the boss and 4 far to the boss. Everyone gets a debuff, one role (supports or DPS) with shorter timers than the others. If you don't stand at the spotlight the moment the debuff ends, you will die. Multiple people with the same debuff durations can't stand at the same spotlight together. Right after this, the boss casts Funky Floor making red tiles dangerous to stand on and alternating between safe and unsafe tiles. Soon after, Outside In or Inside Out is cast, the cast name telling which attacks are going to happen - for Outside In a donut followed by melee AoE, the opposite for Inside Out. Immediately afterwards, a Flip to A/B-side is cast which will determine the type of stacks for 2/3/4-snap Twist & Drop the Needle that happens after the longer debuffs expire.
a
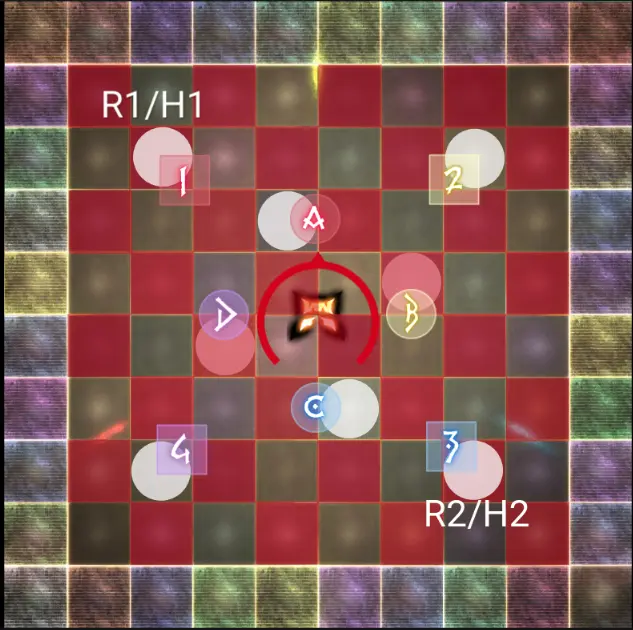
First, determine where the safe spotlight will be. Position your camera in such way, that when the cast ends and the arena changes, you can see which spotlights are on the red tiles. Ranged DPS and healers need to just notice which corner has a spotlight on a red tile. That's the tile they should stand on when their timer ends. R1/H1 take the one on the west, R2/H2 on the east. Far red tile spotlights are diagonal to each other, so you only need to remember one corner no matter your position and then either go there if it's your side or go to the corner diagonal to that.
For melees things are more complicated, follow the strategy chosen by your party.
Now that you remembered where to go in some 20-30 secs, dodge Outside In / Inside Out then start moving to your position. Pay attention to the castbar for the Flip to A/B-side and remember if it's roles or light parties, move to your spot when you're done with the spotlight.
 One of the possibilities for ranged/healers
As an M2, following the raidplan for melee spotlights, the reaper focused on the eastern and southern sides of the arena before the cast ended. The red tile spotlight is on the east, so the safe tile spotlight is on the south. The timer is short, which means safe tile spotlight is the one to go to. The reaper dodges AoE attacks and stays around the right spotlight and realizing that as an M2, there's no need to go anywhere else for the cleave attacks. In the distance, you can see a far red tile spotlight at the northeast corner appearing when the arena changes, where the red mage and the sage move for their debuffs.
Arcady Night Fever
q
The boss does cone AoE attacks, first and last targeting just one player, others - two, a DPS and a support. Each attack repeats at the same place one more time. At the same time, donut and melee AoE attacks around the boss happen as well. After getting hit everyone gets a debuff - either alpha or beta.
a
Spread such that DPS are on one side of the map and supports are on the other. The exact sides as well as positions after getting hit differ depending on your party's chosen strat. Note that the donuts and melee AoEs intersect, i.e. you can't just stand at the edge and move a little back and forth, instead you have to run. You also can't backpedal as the movement speed is too slow to dodge the AoE. Either move your camera to run/strafe or use legacy movement.
As an M2, following the raidplan strat, the reaper stood on the eastern side of the arena. To quickly run away from the AoE, left/right keybinds are set to strafe left/right. The reaper moves the camera left using RMB, then presses A, thus running to the left.
q
This is immediately followed by Let's Dance! during which the boss casts half arena cleaves based on the currently selected frog's hand. While this is happening, alpha and beta debuffs start expiring. If at the time of its expiration you don't stand with someone who has the opposite debuff with same debuff duration, you will get huge bleed. If everything is done correctly, you'll get Perfect Groove buff increasing your damage by ~5% and giving a lot of LB charge.
a
Position your camera such that you can easily see the frogs' hands, stand at the center line and dodge left/right as you look at the frogs. To deal with the debuffs follow your party's chosen strategy. Try really hard to get Perfect Groove for the buff and LB, otherwise you might fail at the enrage (with the current ~740 ilvl).
The reaper first looked at the frog to determine the safe side, then, following the conga strat, at ~60-70% of the cast peeked at the debuff timer and saw 20 secs, which meant being at the furthest tile.
Ride The Waves
q
First, Flip to A/B-side is cast. It's followed by Ride the Waves which is just a bunch of dangerous moving tiles, during which Eighth Beats and Quarter Beats happen in any order. Eighth Beats is just a spread mechanic while Quarter Beats requires you to pair with someone else. Then the boss casts already familiar Outside In (donut into melee AoE) / Inside Out (melee AoE into donut) sequence and finally 2/3/4-snap Twist & Drop the Needle that was prepared before.
a
Pay attention to the castbar and remember - roles or light parties. Then 4 players move to the safe space close to the boss while the other 4 - further from the boss, the exact compositions and the pairs used next are determined by the chosen strat. Stand together according to the assigned pairs for Quarter Beats and spread around for Eighth Beats. Dodge donut-melee AoE attacks and run to the correct position for role/light party stacks.
As an M2, following the raidplan, the reaper stood in the safe space closer to the boss and paired with OT for Quarter Beats. Flip to B-side was cast before so light party stacks happen after dodging donut-melee AoE attacks.
Frogtourage
q
Two frogs start moving from the adjacent walls separating the arena into safe and dangerous areas. During this, at some point either Quarter Beats or Eighth Beats is being cast ending right as the frogs finish their work.
a
As they start moving, follow the pair of frogs that's more convenient to look at and notice if they go separate ways or towards each other as they hit the wall. Separate ways - safe spaces at the ends of this lane, towards each other - the opposite lane. If you're in LP1, move to the safe area on the east or north, LP2 - west or south. Then either spread around - supports left, DPS right or form the assigned pairs (note that if you follow hector strat, this Quarter Beats pairing uses standard melee-with-melee pairs, not the ones assigned for other Quarter Beats)
The reaper decided to look at the frogs moving east-west as that was more comfortable, moving west as a member of LP2 and stacking with the MT when it became apparent that this is the safe lane.
Disco Infernal 2
q
Four frogs spawn around the boss and four spotlights appear at the edges of the arena moving either to the center of a wall or to a corner. Meanwhile, each role gets a debuff - long or short, indicating when they should stand at a spotlight. As the short debuffs expire, the frogs do cone AoE attacks targeting nearest players and giving another debuff that kills them if they get hit by another one of these cone AoE attacks. The frogs repeat the attacks when the long debuffs expire. After the first set of attacks, the boss starts casting Flip to A/B-side which causes role/light party stacks after the spotlights are done.
a
Stand at your standard clock positions. As the cast ends, check if you have a short debuff (9-7 secs) or a long one (19-18 secs). If you have a short debuff, notice where spotlights are to decide if you should go to a corner or the center of a wall. Your position is either at your marker or the marker of your clock spot color. If you have a long debuff, stand near the frog in such a way that the attack doesn't hit spotlights. Repeat this again, but now the roles are reversed. Pay attention to the castbar for Flip to A/B-side and play the mech accordingly.
As an M2, the reaper stood at 3, looking at the debuffs at the end of the cast. Short timer - quick camera move: no spotlight at the center yet which means it's moving there. After getting the spotlight, the reaper stands in front of the frog to make sure that the attack hits the previous spotlight position and not the current one with a support standing there.
Arcady Night Encore
q
The Arcady Night Encore cast itself is exactly the same as Arcady Night Fever except you don't get debuffs upon being hit. But this time it's followed by Let's Dance! Remix instead of Let's Dance!. Now the frogs' hands can indicate not just two sides for the cleaves, but four, making it significantly harder to dodge. Like with Let's Dance! perfect dodges will give you Perfect Groove - a ~5% damage buff and LB points.
a
Preposition yourself for the first few frogs, then dodge. At first I tried standing at the center and moving left/right/forward/backward from there keeping the camera on the frogs but with backpedalling being so slow it didn't work too well as I would often lose the center point. Maybe with legacy movement this would work better. Now instead I prefer to actively use the camera, strafing left/right to run backwards and oftentimes looking at the next frog right after the current dodge. Same as before, you should really try to get that Perfect Groove.
Frogtourage 2
q
Two frogs appear, their hands and special effects showing where cleave attacks are going to happen. This repeats one more time and is then followed by Do the Hustle which is just a half-arena boss cleave.
a
Look at the frogs to determine safe area and run there, repeat again, then dodge the boss cleave.
q
The cleaves are followed by two frogs moving from one side of the arena making either the center part safe or the two outer sides. Then four frogs appear around the boss and after some delay do cone AoE attacks targeting nearest players and giving them a debuff killing them if they get hit by the attack again. This repeats one more time, this time the part that was safe before will be unsafe and vice versa.
a
Make sure you stand at your standard clock positions. Like in Frogtourage, check if the frogs go separate ways or towards each other upon hitting the wall. Separate ways - center lane is safe, towards each other - outer lanes are safe. Now bait the frogs by standing near them - supports first, DPS second. If the center lane is safe, baiters stand in front of their frogs looking at the boss, this way the cone AoE attacks will be directed away from the boss, which is where non-baiters are going to stand. If the outer lanes are safe, baiters stand just at the edge of the safe space looking slightly diagonally at the their frogs such that the attacks will be directed away from the center of a lane, while non-baiters stand further away from the edge at the center of their lanes.
As an M2, the reaper stood at 3 and looked at the frogs hitting the wall - they went separate ways, thus making center lane safe. Knowing that supports are the first to bait, the reaper stood right in the boss. For the next pair of frogs, it was DPS's turn to bait so the reaper stood right at the edge of the safe area aiming the cone attack further away from the center
q
Immediately afterwards, Do the Hustle is being cast which spawns two frogs with their hands indicating cleave directions while the boss prepares his own cleave attack.
a
Look at the frogs to determine safe area then take into account the boss cleave.
Funky Floor 2
q
This is the same Funky Floor that happens in the first Disco Inferno, but this time there are no spotlights and no Flip to A/B side casts. Instead Quarter Beats or Eighth beats is cast first, followed by Outside In / In Outside attacks and then the opposite Quarter Beats / Eighth beats.
a
Spread if you see Eighth beats cast or pair up if it's Quarter Beats according to the assigned pairs. Then dodge Outside In / In Outside and play the opposite Eighth beats / Quarter beats.
Following the raidplan pair assignments, as an M2, the reaper paired up with the OT for Quarter Beats.